
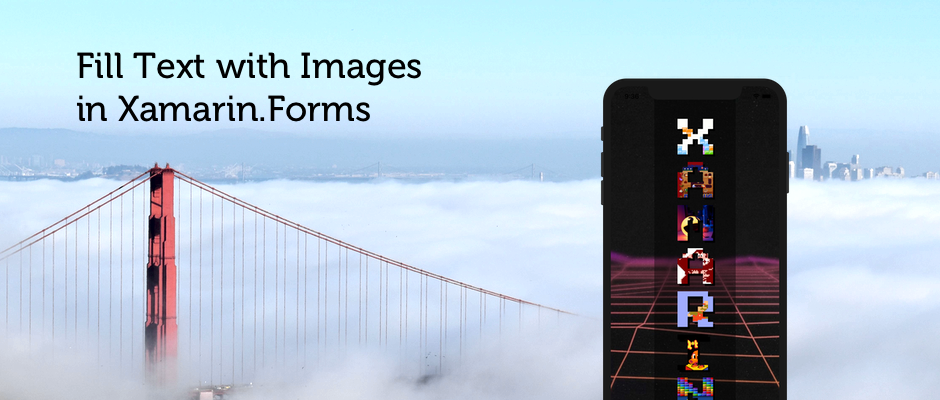
Filling text with images seems like an easy thing to do with tools like Photoshop, but can be a tedious task when developing it for mobile apps. I wanted to see if this was possible and got it working using the Experimental Xamarin.Forms Shapes. Read the steps below to learn how to fill text with images in Xamarin.Forms, or dive directly in the demo code on Github.
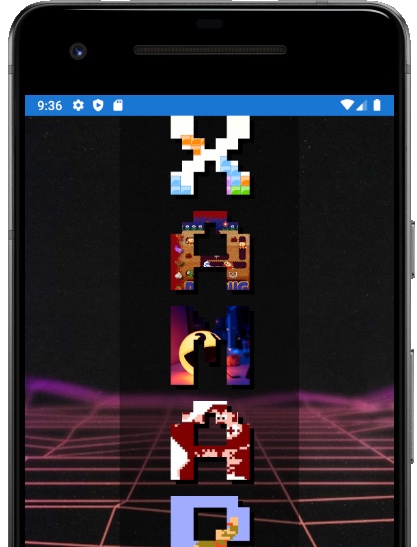
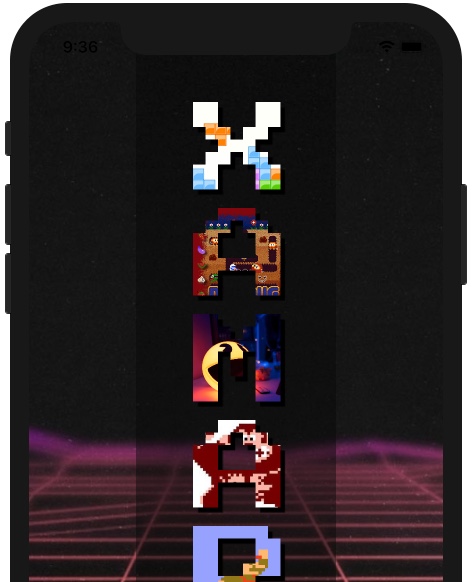
The demo that I created is fully inspired by some retro games, can you name them all? I’ll give you a hint: they were part of the Pixels-movie as well. Answers can be found at the bottom of this post!
Draw text from a Path
First we’ll need to get the Path data from the font that we want to use. The Google font to SVG path converter is an excellent source to convert any Google Font to Path data. I selected the Press Start 2P-font since it has that retro vibe and is thick enough to keep the image visible.
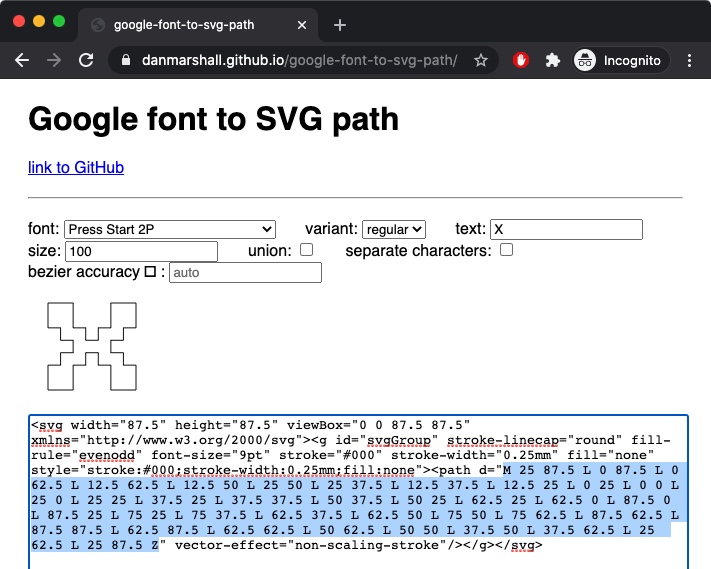
Simply fill in the text that you want to convert to Path data and the tool will generate it for you. Copy this data into your Xamarin.Forms application and use the Path-shape do draw the character.
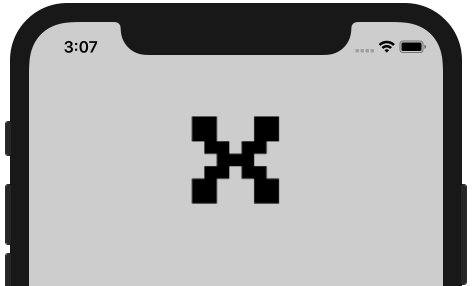
<Path Fill="Black"
    Data="M 25 87.5 L 0 87.5 L 0 62.5 L 12.5 62.5 L 12.5 50 L 25 50 L 25 37.5 L 12.5 37.5 L 12.5 25 L 0 25 L 0 0 L 25 0 L 25 25 L 37.5 25 L 37.5 37.5 L 50 37.5 L 50 25 L 62.5 25 L 62.5 0 L 87.5 0 L 87.5 25 L 75 25 L 75 37.5 L 62.5 37.5 L 62.5 50 L 75 50 L 75 62.5 L 87.5 62.5 L 87.5 87.5 L 62.5 87.5 L 62.5 62.5 L 50 62.5 L 50 50 L 37.5 50 L 37.5 62.5 L 25 62.5 L 25 87.5 Z" />
This code will give you the following result:
You can repeat this process with all the other characters and change the font to your needs.
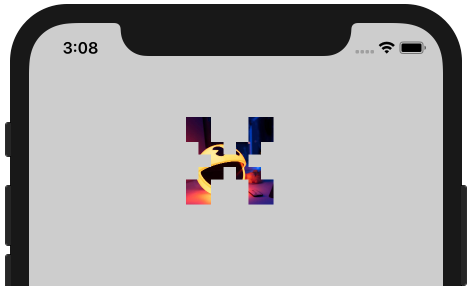
Clip an Image using the Path
Having a black background is pretty boring and you could easily use Embedded Fonts if this is the goal that you want to achieve. We’ll spice it up by applying an image to this character. Or, in other words, get an image and only keep the Path data that represents the character.
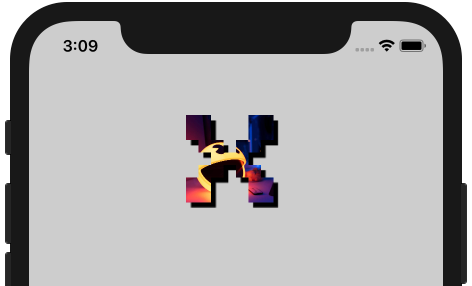
We can achieve this by using the Clip property of an Image. Passing along the Path data clips away the rest, resulting in text that has a background image!
<Image HeightRequest="100"
    Source="https://raw.githubusercontent.com/marcofolio/Arcade/master/_img/03-pacman.jpg"
    Clip="M 25 87.5 L 0 87.5 L 0 62.5 L 12.5 62.5 L 12.5 50 L 25 50 L 25 37.5 L 12.5 37.5 L 12.5 25 L 0 25 L 0 0 L 25 0 L 25 25 L 37.5 25 L 37.5 37.5 L 50 37.5 L 50 25 L 62.5 25 L 62.5 0 L 87.5 0 L 87.5 25 L 75 25 L 75 37.5 L 62.5 37.5 L 62.5 50 L 75 50 L 75 62.5 L 87.5 62.5 L 87.5 87.5 L 62.5 87.5 L 62.5 62.5 L 50 62.5 L 50 50 L 37.5 50 L 37.5 62.5 L 25 62.5 L 25 87.5 Z" />
The code above will produce the following output:
Bring it all together
Now that we have that first character, we already got the core of this technique. We’ll need to add more characters for the complete text and I also added a Path behind the text to give it a little bit of a shadow.
<!-- X -->
<AbsoluteLayout>
    <Path Fill="Black" Margin="5, 5, 0, 0"
            Data="M 25 87.5 L 0 87.5 L 0 62.5 L 12.5 62.5 L 12.5 50 L 25 50 L 25 37.5 L 12.5 37.5 L 12.5 25 L 0 25 L 0 0 L 25 0 L 25 25 L 37.5 25 L 37.5 37.5 L 50 37.5 L 50 25 L 62.5 25 L 62.5 0 L 87.5 0 L 87.5 25 L 75 25 L 75 37.5 L 62.5 37.5 L 62.5 50 L 75 50 L 75 62.5 L 87.5 62.5 L 87.5 87.5 L 62.5 87.5 L 62.5 62.5 L 50 62.5 L 50 50 L 37.5 50 L 37.5 62.5 L 25 62.5 L 25 87.5 Z" />

    <Image HeightRequest="100"
            Clip="M 25 87.5 L 0 87.5 L 0 62.5 L 12.5 62.5 L 12.5 50 L 25 50 L 25 37.5 L 12.5 37.5 L 12.5 25 L 0 25 L 0 0 L 25 0 L 25 25 L 37.5 25 L 37.5 37.5 L 50 37.5 L 50 25 L 62.5 25 L 62.5 0 L 87.5 0 L 87.5 25 L 75 25 L 75 37.5 L 62.5 37.5 L 62.5 50 L 75 50 L 75 62.5 L 87.5 62.5 L 87.5 87.5 L 62.5 87.5 L 62.5 62.5 L 50 62.5 L 50 50 L 37.5 50 L 37.5 62.5 L 25 62.5 L 25 87.5 Z"
            Source="https://raw.githubusercontent.com/marcofolio/Arcade/master/_img/03-pacman.jpg" />
</AbsoluteLayout>
Now repeat this process for all the characters, add a fancy background and make it look good. The complete result can be viewed in the MainPage.xaml . Since we’re working with Xamarin.Forms, the end-result will look pretty on both iOS & Android!
Conclusion & Download
Although the result might look pretty good, it does feel a bit like a hacky solution. Since the text isn’t real text, but rather images that are clipped down, screen readers won’t work. Another downside is that not all fonts can be used, where Xamarin.Forms gives Exceptions due to not being to able to parse all the data.
Just like the Colorful Geometric Background sample, I would not recommend to use this in production right now, but there might be prettier solutions in the future. Feel free to poke around in the code on Github and send me a PR if you have one! What do you think?
The following games were used in the demo. How many did you guess correctly?
All product names, logos, and brands are property of their respective owners.


1 comments On How to Fill Text with Images in Xamarin.Forms
I guessed four games :/