
Like I said in my previous article, the power of Microsoft Cognitive Services is amazing. With just minimal effort having machine learning at your fingertips is extremely useful. I wanted to dive even deeper in Cognitive Services and was intrigued by the Entity Linking Intelligence Service. I already knew the Computer Vision API could do some OCR and I wanted to combine these to try something that I already thought of years ago.
When you visit a museum and you look at a painting, 9 out of 10 times there’s a sign next to it with some information about it. Although many art experts will know exactly what painting technique is used, who the artist is, why he painted it etc., I’ll be needing more information than what’s on that sign. This is where Entity Linking will come in useful.
Once again we’ll be using Xamarin.Forms with a focus on iOS (but Android and/or UWP will work the same way). The source code can be found on Github.
Let’s see if the combination of these cognitive services can help us to achieve this goal!
The goal
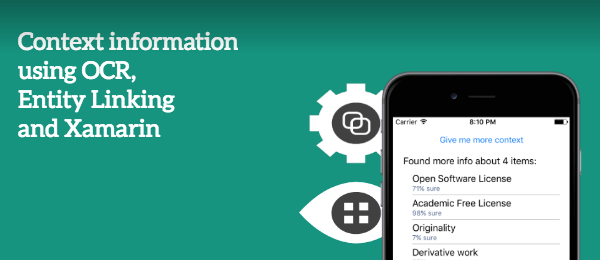
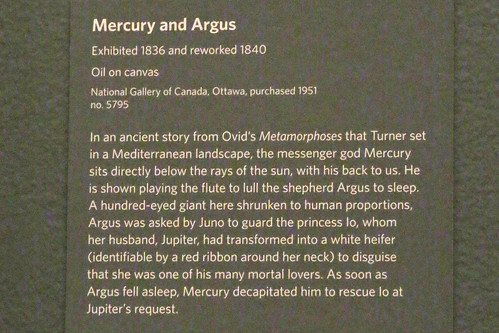
So the idea of this app is simple: Take a picture of the sign, process it through OCR and let Entity Linking tell you what more contextual information is available. Because this app will give you more contextual info, we’ll just call it the GiveMeContextInfo-app. Since I haven’t visited any museums lately, we’ll just use the following image as an example.
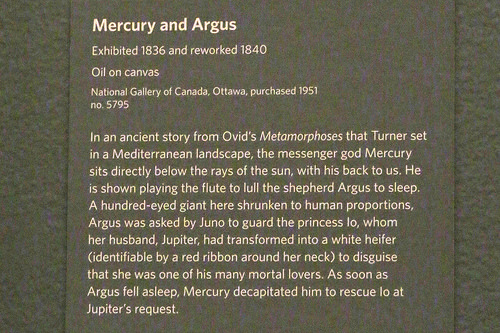
I can read the words, but I don’t know what everything means in this context. Now let’s get everything up and running to see if this will work!
Requirements
In order to get everything up and running, we’re going to need the following:
- A Computer Vision API Key. We’ll need it in order to use the services from Microsoft. Simply head to the Computer Vision API page, press Get started for free and follow the steps until you have your API key.
- A Entity Linking API Key. Just like the Computer Vision API Key, simply head over to Entity Linking Intelligence Service page, press Get started for free and continue from there.
- Since we’ll be using Xamarin.Forms, the Media Plugin will be used. This will allow us to select a picture in a cross-platform way.
- We’ll also need the Vision API Client Library as well as the Entity Linking API Client Library to call the Microsoft Cognitive Service. It still has Project Oxford in the namespace, but that was later rebranded.
With both your API key stored and the packages added to your Xamarin.Forms solution, let’s continue with the next step.
View
Since we don’t need antyhing fancy to show in the UI, we’ll just just this simple XAML.
<Button Command="{Binding TakePictureCommand}" Text="Give me more context" />
<Label Text="{Binding Description}" />
<ListView ItemsSource="{Binding ContextInfo}"
		SelectedItem="{Binding SelectedContextInfo}"
		IsVisible="{Binding HasResults}">
	<ListView.ItemTemplate>
		<DataTemplate>
			<TextCell Text="{Binding Name}"
			    Detail="{Binding ScoreText}"  />
		</DataTemplate>
	</ListView.ItemTemplate>
</ListView>
As you can see, this simply is a Button in order to select an image, a Description in order to give the user some feedback and the ListView will be used to display the results. When we hook up that View to our ViewModel, we’re all set to get this working!
The services
Instead of placing everything inside one ViewModel like I did in my previous example, I decided to split everything into several services to make things a little bit more clear.
MediaService
The Media Service is needed in order to pick the picture. It’s fairly straightforward:
public static async Task TakePhotoAsync () {
    await CrossMedia.Current.Initialize ();

    MediaFile photo;
    if (CrossMedia.Current.IsCameraAvailable)
    {
        photo = await CrossMedia.Current.TakePhotoAsync (new StoreCameraMediaOptions {
            Directory = "GiveMeContext",
            Name = "context.jpg"
        });
    }
    else
    {
        photo = await CrossMedia.Current.PickPhotoAsync ();
    }
    return photo;
}
ComputerVisionService
Now that we have our picture, we’ll use the Computer Vision API to do some text recognition. We’re going to use the RecognizeTextAsync to extract the text from the image.
public static async Task RecognizeTextAsync (MediaFile photo) {
    OcrResults ocrResults;
    var client = new VisionServiceClient (COMPUTER_VISION_API_KEY);
    using (var photoStream = photo.GetStream ()) {
        ocrResults = await client.RecognizeTextAsync (photoStream);
    }

    var text = "";
    foreach (var region in ocrResults.Regions) {
        foreach (var line in region.Lines) {
            foreach (var word in line.Words) {
                text = $"{text} {word.Text}";
            }
        }
    }

    return text;
}
Obviously, you’ll need to use your own COMPUTER_VISION_API_KEY. Now that we got all of the text, we can use it to process it into our Entity Linking API.
EntityLinkingService
Just like with the Computer Vision API, using the Entity Linking API is really simple. We just pass along the text to the LinkAsync-method and the Entity Linking API provides us with all the data we need.
public static async Task> LinkEntityAsync (string text) {
    var client = new EntityLinkingServiceClient (ENTITY_LINKING_API_KEY);
    var linkResponse = await client.LinkAsync (text);

    var result = new List<EntityLink> ();
    foreach (var link in linkResponse) {
        result.Add (new EntityLink () {
            Name = link.Name,
            Score = link.Score,
            WikipediaID = link.WikipediaID
        });
    }
    return result;
}
Once again, you’ll need your own ENTITY_LINKING_API_KEY here, but that’s changed easily.
Gluing it all together
Now that we’ve got all services in place, the only thing our ViewModel has to do is call them. It’s just as simple as this:
var photo = await MediaService.TakePhotoAsync ();
var recognizedText = await ComputerVisionService.RecognizeTextAsync (photo);
var linkedEntities = await EntityLinkingService.LinkEntityAsync (recognizedText);
foreach (var linkedEntity in linkedEntities)
{
    ContextInfo.Add (linkedEntity);
}
The ContextInfo is something we display in our View and that’s all there is to it!
Results
When everything is glued together and the ViewModel has been changed accordingly, we can test if it works. Now you’ll be able to take a picture and get the contextual information by getting the respective Wikipedia pages as well! Doesn’t this look great?

The text from the picture has been recognised and the proper context information has been given. All to give you some more background information other than what’s on the sign.
Conclusion
I was pretty much amazed at how easy and powerful this is. The OCR from the Computer Vision API helped to get the text from the picture, but I was just as much amazed by how the Entity Linking API gives us the proper information. Did you notice the Entity Linking API linked to the Mercury (mythology) page directly, instead of the default Mercury or Mercury (planet) page? It decided the context was about the Roman God and not about the Planet, that’s pretty awesome!
This shows an even stronger potential of the Microsoft Cognitive Services and I can’t wait to play around with it even more. Don’t forget to poke around in the example code on Github and tell me what you think through Twitter!
