
Chatbots (or bots) are hot. Retrieving data through natural language is getting more and more common. Many people already have apps like Slack or Messenger installed and letting them use your application through these channels can provide you with more opportunities. In this article I’ll show you how to build your first chat bot with Bot Framework and LUIS. Although LUIS is not required for the bot framework itself, we dive directly in the combination of both. Check out my previous article on how to set up LUIS. Building a bot with the Bot Framework is extremely easy, yet very powerful. Let’s see how this can be done!
Build a great conversationalist.
Requirements
Before we continue, make sure you have the following installed:
- I’ll be using Visual Studio as my IDE.
- Bot Framework Visual Studio Template: This allows you to create a Bot Framework project easily.
- Microsoft Bot Framework Emulator: Needed to emulate talking to your bot.
- A LUIS model. I’ll be using my
RestaurantLuisModelfrom my previous article. Don’t forget to publish this app in LUIS.
The Project
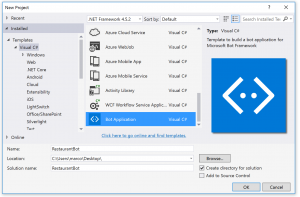
Download the Bot Framework Visual Studio Template and install it as a ProjectTemplates. Once installed correctly, create a new project in Visual Studio. Select Bot Application and give it a name. Create your solution and you’re ready to build your first bot.
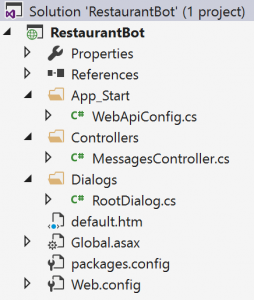 Let’s inspect the most important things the template created for us:
WebApiConfig: Since the Bot Framework runs on ASP.NET WebAPI, this class is needed to handle settings, config and routes.MessagesController: This controller handles all incoming messages that will be consumed by the bot. Especially take a look at the following pieces of code:HandleSystemMessage(Activity message): System messages can be handled as well, for example you can get notified when the user is typing a message.new Dialogs.RootDialog(): When a user message is received, theRootDialogis created.
RootDialog: The starting point of our bot. Inspect theMessageReceivedAsync-method where you’ll see that the bot will respond to any message by telling you how many characters you’ve sent.
Without doing anything furter, we’re able to talk to this bot. Simply build and run the application which will start your browser with a general message from the default.htm-file.
The Emulator
To be able to talk to this bot, we’ll first be using the emulator. Simply start this application and enter your endpoint URL. Since the application is running locally, enter the URL from the browser window that just opened and append /api/messages (this is the default route). Hit Enter and the Emulator will start connecting with the bot. Simply type a message and start chatting with your first bot!
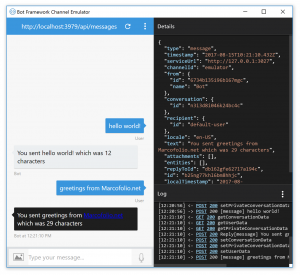
Inspect the following parts of the emulator:
- The URL on top where you’re able to see to which bot you’re connected to.
- The messages window on the left side to show you the conversation.
- If you click on a message, you’ll get more (technical) details in the Details-pane.
- The Log-pane displays the current activity and communication.
Adding LUIS
Now that we got our first bot up and running, it’s time to make it a bit smarter by adding LUIS to the mix. Simply make the RootDialog able to handle the Intents you’ve defined in LUIS. Change the class to look like the following:
[LuisModel(Constants.LUIS_MODEL_ID, Constants.LUIS_SUBSCRIPTION_KEY)]
[Serializable]
public class RootDialog : LuisDialog<object>
{
    #region None

    [LuisIntent("")]
    [LuisIntent("None")]
    public async Task None(IDialogContext context, LuisResult result)
    {
        await context.PostAsync("Sorry, I'm not able to handle that.");
    }

    #endregion

    #region OrderFood

    [LuisIntent("OrderFood")]
    public async Task OrderFood(IDialogContext context, LuisResult result)
    {
        await context.PostAsync("I understand that you want to order some food.");
    }

    #endregion
}
Let’s walk over this code step by step:
- A
LuisModelattribute has been added, requiring aLUIS_MODEL_IDandLUIS_SUBSCRIPTION_KEYfrom LUIS.LUIS_MODEL_IDcan be found on the Overview for your app, also called an App Id.LUIS_SUBSCRIPTION_KEYcan be found under My Keys.
- The dialog now inherits from
LuisDialog. - The
LuisIntentattributes are used to handle the Intents that LUIS recognized. They should have the same name as configured in LUIS.
That’s all there is to it! Simply build and run, fire up your emulator again and start talking to your bot to see if LUIS is able to recognize the intents.
Entities
But LUIS isn’t only able to recognize Intents, but also Entities which makes everything a whole lot more powerful. In LUIS we’ve defined food as an Intent, so let’s try to extract that in the OrderFood-method.
[LuisIntent("OrderFood")]
public async Task OrderFood(IDialogContext context, LuisResult result)
{
    // Check if LUIS has identified the entity that we should look for.
    string food = null;
    EntityRecommendation rec;
    if (result.TryFindEntity("food", out rec)) food = rec.Entity;

    if(string.IsNullOrEmpty(food))
    {
        await context.PostAsync("I understand that you want to order some food.");
    }
    else
    {
        await context.PostAsync($"I understand that you want to order {food}.");
    }
}
As you can see, we’re using TryFindEntity to search for the LUIS Entity we’re looking for. When we have that value, we display it to the user. It’s that easy! Now build and run again and see your first chat bot with LUIS come to life in your emulator.

Conclusion
With just a few lines of code we’re able to make to make our first smart bot using the Bot Framework and LUIS. As you can imagine, we’ll need more to actually make this a useful bot but this is a pretty good start. Simply start adding more Intents to LUIS and let the Bot Framework handle these. Stay tuned for more articles about smart bots and the Bot Framework. Let me know what you think in the comments or on Twitter.
Want to learn more about this subject?
Join my “Weaving Cognitive and Azure Services“-presentation at TechDaysNL 2017!