
Although the TechDaysNL are over, there is still a part about test automation of apps that I haven’t covered in my blog posts. I did touch this subject briefly in my previous post, this article will go a little bit deeper on how to interact with your app programmatically using Xamarin.UITest.
When you’ve started with my first article about this subject and made it all the way here, you should be able to write some specifications that we’ll be able to automate so testing effort will be automated. It’s a great way for ATDD/BDD/SBE and will help speed up your release cycle.
Assuming you’ve already got the setup up and running, let’s see how we can let a computer interact with your app using C#!
For this demo, we’ll be using the TechDaysNL-app as an example. The people from Xpirit open sourced it during the conference. All the example code in this article can be found on my GitHub page as well. To get a better understanding of this article, I would recommend you to download the code as well.
The solution
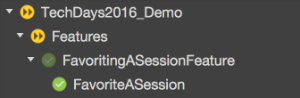
The solution can be opened by Visual Studio or Xamarin Studio. You’ll find the following solution structure.
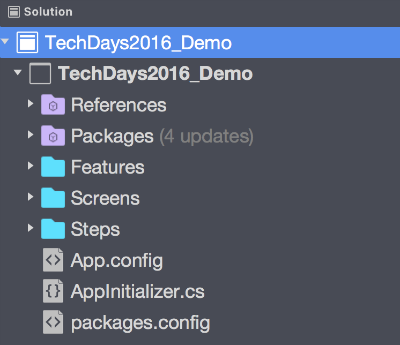
Let’s break it down into parts:
- Features: This folder contains the features from the application, written in a Gherkin-format.
- Screens: This folder contains the screens from the application so that we’ll be able to navigate through the app.
- Steps: Here we’ll find the implementation of the steps defined in the
*.feature-files. AppInitializer.cs: Some startup code in order to load the APK and to set the values from theFeatureContext.
Feature
In this example we’ll have a feature that allows us to favorite a session. The file looks like this:
Given I am on a Session Details page
When I press Favorite
Then The session will be marked as Favorite
And I should see "Remove from Favorites"
It’s a fairly simple feature, since I wanted to focus on the Screens and Steps in this article.
Screens
We’ll need to define the several screens of the applications in order to navigate through the app. It’s written using a Page Object Pattern, making it re-usable for multiple platforms. Here you’ll only find the Android implementation, but an iOS implementation can be added with ease.
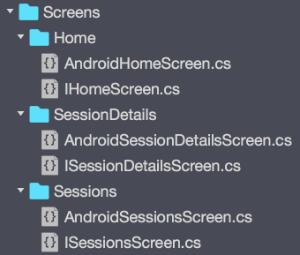
To zoom a little bit further in the code, this is how parts of the IHomeScreen.cs and AndroidHomeScreen.cs look like.
public interface IHomeScreen
{
    Func<AppQuery, AppQuery> SessionsBtn { get; }
}

public class AndroidHomeScreen : IHomeScreen
{
    public Func<AppQuery, AppQuery> SessionsBtn { get; } =
        new Func<AppQuery, AppQuery> (c => c.Marked ("Sessions"));
}
As you can see, it’s using the AppQuery.Marked Method in order to find the Sessions Button on the Home Screen. There are many ways to query the UI, but this one is one of the easiest. If you can’t use this, use the REPL or Xamarin Test Recorder to find the elements in a unique way.
Now that we’ve defined all screens and elements we want to interact with, we can start to navigate around.
Steps
Here we’ll use Specflow to bind the Feature to C# that we can use. Here’s an example on how the bind the first line from the feature file to C#.
[Given (@"I am on a Session Details page")]
public void GivenIAmOnASessionDetailsPage ()
{
    // Navigate to Sessions
    app.Tap (homeScreen.MenuBtn);
    app.WaitForElement (homeScreen.SessionsBtn);
    app.Tap (homeScreen.SessionsBtn);
}
Here you see that we programatically press the Menu button to open it and navigate to the Sessions page. We use the app.Tap to press on the several buttons. There are loads of functions that we can use to interact with the UI (example: .ScrollDownTo)
Pay special focus for the WaitForElement method. Here we’ll make sure the element that we want to interact with is actually on the screen. This is particularly useful when there’s some waiting involved, for example when data is loaded or an animation is executing. The WaitForNoElement Method is created to wait until the element is not available (useful for loading icons).
In the Then-Step, we can use this same technique to retrieve the data that we see on the UI in order to Verify if everything is working correct. We simply Assert the data and expected result in order to see if everything is working.
[Then (@"I should see ""(.*)""")]
public void ThenIShouldSee (string text)
{
    var result = app.Query (c => c.Marked (text)).Length;
    Assert.AreEqual (1, result);
}
Run
We’ve got all steps completed in order to run this and check if our Feature is working. When you compile the solution, you’ll find the following in the Unit tests-Window.
Execute this test and make sure you have a device connected or an emulator running. The app will start to run and our tests will navigate through the app. Look ma, no hands!

Conclusion
Using Xamarin.UITest allows us to navigate through an app with ease, making automated testing possible. In the example code you’ll also find the use of Scenario Outlines, bringing Specification by example (SBE) even closer. Run these test fully automatically in Xamarin TestCloud and you’re all set! Let me know what you think through Twitter.