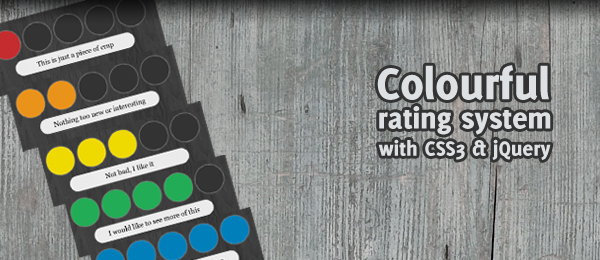
Today, we’re going to do a relatively simple jQuery tutorial. Rating systems are used a lot on websites, for example to rate how good a certain product, article or comment is. I slightly wanted to improve this idea, by making it more visually attractive.
By using the jQuery Color plugin, we can animate colours. Simply use the animate() function from jQuery to have colours fade to another colour. When using this technique, combined with some CSS3 feautures (rounded corners and drop shadow), we can create a Colourful rating system.
As usual, since CSS3 isn’t supported (yet) by every browser, the demo page only fully works on those browsers that support it (Firefox, Safari and Chrome). Other browsers will not see the circles, but will see colourful blocks that can be used as a rating system.
Should I do more jQuery "basic"/quickies in the future? Simply let me know and I’ll do that! For now, let’s see how you can create your own colourful rating system with jQuery and CSS3.
Demo video
For those who don’t have a CSS3 supported browser, here’s the demo page using Firefox.
Simple, beautiful yet effective, right? Now let’s see how you can implement it on your own website.
HTML
We’ll be using a really minimal form of HTML; Just a simple list with items (links) with a small description of what the rating text would be.
<ul id="rating">
   <li><a href="#">This is just a piece of crap</a></li>
   <li><a href="#">Nothing too new or interesting</a></li>
   <li><a href="#">Not bad, I like it</a></li>
   <li><a href="#">I would like to see more of this</a></li>
   <li><a href="#">This is the best thing I've seen</a></li>
</ul>
Yup – that’s all there is to it! Don’t forget to load jQuery and the jQuery color plugin on the page, but that’s pretty obvious.
CSS
Just like the HTML, the CSS of this isn’t very advanced. We simply display the list inline and give each item a fixed width and height. I’ve removed the vendor specific prefixes (like -moz- and -webkit-), but you can find it in the download. Notice the background color of the circle: #333. The text-indent is used to hide the text.
#rating { list-style:none; }
#rating li { display:inline; float:left; }
#rating li a { display:block; width:80px; height:80px; border:1px solid #888; background-color:#333;
   text-indent:-9999px; box-shadow:0 0 5px #888; border-radius:40px; }

#ratinginfo { clear:left; width:350px; }
#ratinginfo p { text-align:center; padding:10px;
   box-shadow:0 0 5px #888; border-radius:40px; }
But wow, did you notice the #ratinginfo? We didn’t create that in the HTML (we only created the #rating element). The rating info (the text below the circles) will be injected by jQuery.
jQuery
After we’re done loading jQuery and the Color plugin, we’re ready to use jQuery to now animate the circles to the right colour and display the text. But how to do it? This is what I came up with:
// Variable to set the duration of the animation
var animationTime = 500;

// Variable to store the colours
var colours = ["bd2c33", "e49420", "ecdb00", "3bad54", "1b7db9"];
First, we’ll need some variables. The first one is the animation time; the duration of the animations (fading effects). The second one is more interesting: It’s an array with colours that we’re going to use as the circle colours. Since we created five rating options, we also have five colours defined.
// Add rating information box after rating
var ratingInfobox = $("<div />")
   .attr("id", "ratinginfo")
   .insertAfter($("#rating"));

// Function to colorize the right ratings
var colourizeRatings = function(nrOfRatings) {
   $("#rating li a").each(function() {
      if($(this).parent().index() <= nrOfRatings) {
         $(this).stop().animate({ backgroundColor : "#" + colours[nrOfRatings] } , animationTime);
      }
   });
};
After that, jQuery dynamically created a new div using the jQuery 1.4 syntax: The #ratinginfo (we already saw that one in the CSS). We insert it after the rating circles.
We also define a function called colourizeRatings. It expects a number (nrOfRatings) it has to colour. When this function is called, it loops through all the rating elements to see if it’s index() is smaller than the given nrOfRatings. All those that are smaller will be colourized using the animate function.
Take a small note of this piece of code:
$(this).parent().index()
We ask the index() of the parent() to know which circles to colourize. The parent item from the anchor element is the list item. A list item "knows" the index of the list, which is what we’re using. Now that we have this, the rest of the code is pretty straight forward (I’ve added comments in the source code too).
// Handle the hover events
$("#rating li a").hover(function() {

   // Empty the rating info box and fade in
   ratingInfobox
      .empty()
      .stop()
      .animate({ opacity : 1 }, animationTime);

   // Add the text to the rating info box
   $("<p />")
      .html($(this).html())
      .appendTo(ratingInfobox);

   // Call the colourize function with the given index
   colourizeRatings($(this).parent().index());
}, function() {

   // Fade out the rating information box
   ratingInfobox
      .stop()
      .animate({ opacity : 0 }, animationTime);

   // Restore all the rating to their original colours
   $("#rating li a").stop().animate({ backgroundColor : "#333" } , animationTime);
});

// Prevent the click event and show the rating
$("#rating li a").click(function(e) {
   e.preventDefault();
   alert("You voted on item number " + ($(this).parent().index() + 1));
});
We first handle the hover events for the circles. The rating information box we created in our first step is cleared, the text from the HTML is added and slowly fades in. We than call the colourizeRatings function, once again using the index() of the parent. On mouse leave, the rating information box fades away and the background colour from the circles is set back to #333 (remember that from the CSS?).
For demonstration purposes, we also handle the click() event. We prevent the default behaviour (since we don’t want to follow the URL), but we’ll show the user a message box on which item he clicked.
That’s all there is to create a colourful rating system with CSS3 and jQuery!
Download and Conclusion
Of course, you can handle the click event to call the server using AJAX and let the vote count. Another thing that could be implemented, is when the user clicks the selection will stay visible. Since those items weren’t the goal of this tutorial (wanted to show the colour animation and keep it simple), I left it out.
What do you think? Would you improve this script somewhere? And would you like to see more jQuery quickies/small tutorials? Feel free to share it.