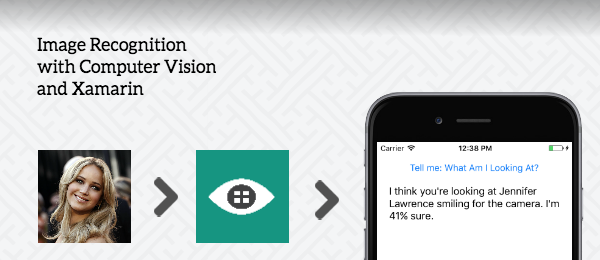
Ever since the Microsoft Cognitive Services were available, I always wanted to give those APIs a spin. The power of machine learning at your fingertips, that’s pretty awesome! Today I managed to hook up a Xamarin app to the Computer Vision API to do some image recognition. The basic idea of this app is really simple: Let the Computer Vision tell you what you’re looking at. Simply take a picture, pass it along the Computer Vision API and display the result in the app. It’ll tell you what it thinks you’re looking at.
Because this is a simple demo, we’ll be using Xamarin.Forms. Although I’ll only focus on iOS here, you can easily extend it to Android and/or UWP. The source code can be found on Github.
So let’s see how you’re able to use the Computer Vision API inside your Xamarin app. I’ll give you a small hint: it’s really simple!
The goal
The goal is that you’re able to take a picture with this app and let the Computer Vision API tell you what you’re looking at. Because that’s essentially all what this app will be doing, I called it the WhatAmILookingAt-app. I prepared a couple of images to be recognised by the Computer Vision API for this demo, but this will work with pictures you take yourself as well.

- The Statue of Liberty
- The Mona Lisa, a painting by Leonardo da Vinci
- My current profile picture on Twitter
- A random celebrity, Ryan Gosling
Let’s see how we can call these from our Xamarin-app and let the Microsoft Cognitive Services do it’s work!
Requirements
In order to get everything up and running, we’re going to need the following:
- A Computer Vision API Key. We’ll need it in order to use the services from Microsoft. Simply head to the Computer Vision API page, press Get started for free and follow the steps until you have your API key.
- Since we’ll be using Xamarin.Forms, the Media Plugin will be used. This will allow us to select a picture in a cross-platform way.
- We’ll also need the Vision API Client Library to call the Microsoft Cognitive Service. It still has Project Oxford in the namespace, but that was later rebranded.
Other lessions that I’ve learned along the way that I wanted to know up front:
- If you want to use pictures in iOS 10, the
NSPhotoLibraryUsageDescriptionis required otherwise your app will crash. Simply add this to yourInfo.plist-file and you’re ready to go. - The image file size must be less than 4MB, otherwise the Cognitive Services won’t work. You might want to do some client-side validation and/or compression for this requirement.
With your API key stored and both packages added to your Xamarin.Forms solution, let’s continue with the next step.
View
For this demo, we’ll use the most simplistic UI possible: Just a button and a result. This is the XAML that I used.
<Button Command="{Binding TakePictureCommand}"
    Text="Tell me: What Am I Looking At?" />
<Label Text="{Binding Description}" />
When we hook up that View to our ViewModel, we’re all set to get this working!
The camera
Since we’re using the Media Plugin, taking or selecting a picture couldn’t be easier. Simply take a picture when a camera is available, otherwise pick a photo from your photo library (ex. when using the Simulator).
await CrossMedia.Current.Initialize ();

MediaFile photo;
if (CrossMedia.Current.IsCameraAvailable)
{
    photo = await CrossMedia.Current.TakePhotoAsync (
        new StoreCameraMediaOptions {
            Directory = "WhatAmILookingAt",
            Name = "what.jpg"
    });
}
else
{
    photo = await CrossMedia.Current.PickPhotoAsync ();
}
We now have our selected picture in the photo-variable, that we can pass along int he Computer Vision API.
The Computer Vision API
I expect this to be the tricky part, but it turned out to be one of the easiest parts to play around with. We’ll be using the Describe image operation to tell us what the Computer Vision API thinks you’re looking at. We can do this with just a couple of lines of code:
AnalysisResult result;
var client = new VisionServiceClient (COMPUTER_VISION_API_KEY);
using (var photoStream = photo.GetStream ())
{
    result = await client.DescribeAsync (photoStream);
}

// Parse the result
var caption = result.Description.Captions [0].Text;
var confidence = Math.Floor(
    result.Description.Captions [0].Confidence * 100);
Obviously, you’ll need to use your own COMPUTER_VISION_API_KEY, but this is it! We’ll just use the first Caption the API will return and will also display at how much Confidence it knows what it’s looking at, just to complete the result. The only thing I added is small transformation to full percentages, since the Confidence is a number between 0 and 1. We display this data in the Description of the View and that’s all we need.
The results
With just these minor lines of code, we’re all set to get the app up and running. This is what the result will look like.

In case this demo goes a little bit too fast, these are the results the Vision API tells us what you’re looking at.
- A clock tower in the middle of a body of water (22% sure).
- Leonardo da Vinci sitting at night (53% sure).
- A man standing on a rock (62% sure).
- Ryan Gosling wearing a suit and tie (89% sure).
Conclusion
Although not all results are perfect (since when is the Statue of Liberty a clock tower?), some come really close (I was impressed that not only Ryan Gosling was recognised, but also what he’s wearing). The power of the Microsoft Cognitive Services look very promising! I was also amazed that with just this little effort, something as powerful as image recognition would be available.
I might check out the other Cognitive Services later to see what they’re capable of. Don’t forget to poke around in the example code on Github and tell me what you think through Twitter!


